Wednesday 21 August 2019

Azure DevOps Release Pipeline for Dyn365FO - Part 2: Scheduled Releases with Approvals

This post follows on from Part 1, which covered;


  • Installed to Dynamics 365 Unified Operations Tools in Azure DevOps
  • Created an Azure App Registration
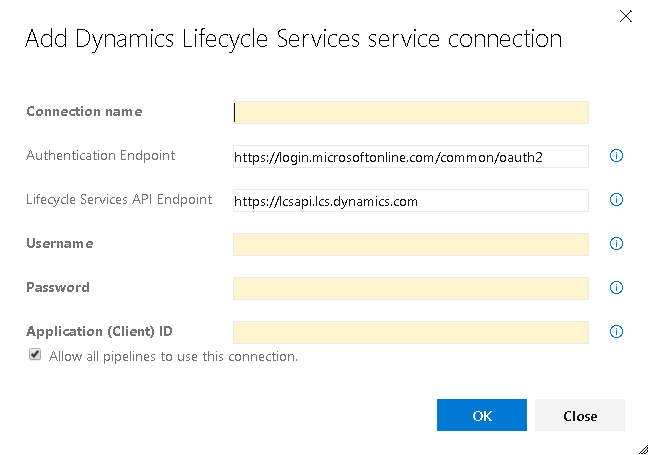
  • Created the Service Connection to Link Azure DevOps to LCS
  • Started a new Release Pipeline
  • Added a Task to Upload an Asset to LCS
  • Added a Task to Deploy an Asset to an LCS Environment


This simple release pipeline is used as a start point for this article.

Azure DevOps Release Pipeline for Dyn365FO - Part 1: Automated Package Upload & Deploy via LCS API


Scenario 1 - Scheduled Upload and Deploy


The first step is to add a schedule the automated deployment. At the end of Part 1, the Release Pipeline we created depended on a manual trigger from an Azure DevOps user. 
   
The next step is to add a schedule to trigger the Release Pipeline automatically. Open the Release Pipeline by clicking Edit, and click on the clock icon in the Artifcacts section, beside the text Schedule not set.


In the Schedule release trigger dialog, click the toggle to enable. This reveals the options for scheduling. For this example I have setup a daily release trigger at 5pm GMT.


Don't forget to set your timezone! If in the UK, change from UTC to UTC+0 (London) to account for British summer & daylight savings time.

We now an asset upload and deploy of the latest build to our test environment scheduled for 5pm daily.


Scenario 2 - Deployment Approval


In this scenario, we extend the current release pipeline to add an approval to the 5pm deployment. It may be that the environment is in use in the evening, and we want to empower our Project Manager with the decision of whether or not to take the latest build.

The Approval will be added to Stage 1 of the Release Pipeline.


Click on Pre-development approvals to enable it, and expand the tab.


Type in the approvers names and save. I used a single approver for this example, but it is also possible to add multiple approvers. Multiple approvers also reveals the approval order option, which allows approval to be in any order, in sequence, or by a single approver.


Set the approval timeout to an hour, after which the approval will auto reject our deployment stage and save.

At the next scheduled release, the approvers will be emailed a prompt with a link to the release where the stage can be approved. Rather than triggering the deployment stage automatically as it did previously, the stage will be delayed until a user approves or rejects it, and it will be automatically rejected when the time runs out.


Follow the link, and click the approve button beneath Stage 1.


This opens the approval dialog, where the stage can be approved immediately or reassigned.


The approver also has the option to add a comment and chose to delay the start of the stage execution. In this example, we delay the deployment until 11pm.


Click approve, and at the specified time the package will be uploaded to LCS and Deployed.


Thursday 15 August 2019

Azure DevOps Release Pipeline for Dyn365FO - Part 1: Automated Package Upload & Deploy via LCS API

Part 1 of this series of Release Pipeline posts covers how to implement the LCS API for uploading and deploying a package from an Azure DevOps build, built for Dynamics 365 for Finance and Operations.

Prerequisites;


  • An Azure DevOps project configured with code and builds
  • A build definition and build agent generating and storing deployable packages in Azure DevOps
  • An Azure Directory where you can register an Application


Step 1: Install the Dynamics 365 Unified Operations Tools


The Dynamics 365 Unified Operations Tools are an Azure DevOps Extension, published by Microsoft, and available on the Visual Studio Marketplace;

Already have the Tools Extension Installed? Skip to Step 2.

https://marketplace.visualstudio.com/items?itemName=Dyn365FinOps.dynamics365-finops-tools&targetId=493c1ca4-8961-4e92-8923-c2135297807f&utm_source=vstsproduct&utm_medium=ExtHubManageList


Visual Studio Marketplace

Click on get it free which will prompt you for which Azure DevOps organisation you want to download the extension to.

Once downloaded, the extension will appear in Azure DevOps in Organisation Settings -> Extensions.


Azure DevOps Installed Extensions


Step 2: Create a Native App in Azure

To register the native app in Azure, browse to https://portal.azure.com and search for App Registrations in the search bar.


App Registrations

Create a Native App Registration and make a note (or more likely take a copy to clipboard/notepad) of the Application (client) ID.


Register an Application in Azure

Once created, an API permission is required for your new App. Create a permission for Dynamics Lifecycle Services, delegated and check user_impersonation.


Request API Permissions in Azure

Azure App and API permission is now set to go. Note: Some people have reported issues creating a native app using the new Azure Directory interface. You may need to revert to the legacy interface to set the app to be native.

More information on setting up an Azure App is available here;

https://docs.microsoft.com/en-us/azure/active-directory/manage-apps/application-proxy-configure-native-client-application


Step 3: Create a Service to connect to the Native App in Azure DevOps


Back in Azure DevOps, we now need to create a service to connect to the Native App Registration we just created.

Go into your Project, Project Settings, and under Pipelines click on Service Connections.

Click New service connection, and in the drop down select Dynamics Lifecycle Services.


New Service Connection
Name your service connection, and enter the credentials you want to use to connect to LCS. This user must be an Environment Manager or Project Owner in LCS, and it would be advisable to use a generic service account.

You will also need to copy and paste in the Application ID created and noted in Azure in step 2.


Create a New LCS Connection Dialog

The connection to LCS is complete. If everything is correct, we can now design the release pipeline to upload and apply our Deployable Package.


Step 4: Create a Release Schedule


In Azure DevOps, browse to Pipelines -> Releases, click on New Release Pipeline, and click Empty job.


New empty Release Pipeline


In the artifacts section, click on Add an artifact. Select your project and Source. The source is the build pipeline to use to retrieve the deployable package from it's artifacts. The default Source Alias can be simplified, here I used BuildMain.


Adding an Artifact to the Release Pipeline

Click on Add to complete.


Step 5: Set the Steps


For this example, we are only creating a simple single stage upload and release. 

In stage 1, click on the hyperlink for the jobs and tasks to open the task list for the stage.


Click on the + to add a task, and search for Dynamics Lifecycle Services. The upload and deploy tasks should appear in the results.


Add tasks search


Select the upload task firstly and add to your stage.

The name will auto complete but change it if needed.

Select the LCS connection we created earlier in Step 3.

Complete the LCS project ID. The easiest way to find this is to browse to your project in LCS and take the number from the end of the URL, for example;

https://lcs.dynamics.com/V2/ProjectOverview/1234567

The File to Upload field, browse to the location of your package. the location will look something like this;

$(System.DefaultWorkingDirectory)/BuildMAIN/Packages/AXDeployableRuntime_7.0.5286.35426_2019.8.14.1.zip

This will pick up the same selected build on every run of the release pipeline task. We need to replace the red text in the build above with a variable which represents the build number, and is the part of the filename which changes with every build.

The variable for the build number is $(Build.BuildNumber).


New LCS Upload Task Parameters


The Asset Name and Asset Descirption can be anything you want, but I find its a good idea to include the branch name, the build number variable again, and something to indicate it was auto uploaded from Azure DevOps.

The last step is to identify the the Output Variable from this new task. The LCS API returns a FileAssetId output variable which we can use when setting up the deploy task to identify which LCS asset we want to deploy. For this example, name the reference Upload.


Upload Task Output Variables

Next click the + again to add a second Task. This time search again for Dynamics Lifecycle Services but select the Asset Deployment task and click Add.

Again, can leave the display name for now, it will auto generate. Select the same connection we created earlier and used in the upload task. Enter your LCS project ID.


LCS Upload Task

Note: there is an error in the screenshot above - the Variable "LCS File Asset Id" should be $(Upload.FileAssetId) with the $ and brackets added to indicate a variable.

The first new field is LCS Environment Id. In LCS, click on the environment you wish to setup the deployment for to view its detailed information page. On there you will see an Environment Id.


LCS Environment Id
In the LCS File Asset Id field we reference the asset Id we saved from the output variable in the upload task, $(Upload.FileAssetId). 


Save the Release Pipeline!

Step 6: Run!


Back in the Release Pipelines screen, Click on Create Release and DevOps will trigger a release run straight away. If you click on the release definition, you can follow the outputs from the release as you do in the builds, and troubleshoot any issues.

Over in LCS, you should see your Deployable Package Land in the Asset Library, and your configured environment hit servicing status as the package is deployed.

Done. A deployment directly from Azure DevOps.

Look out for Part 2 with scheduled releases, pipeline approvals here;

Azure DevOps Release Pipeline for Dyn365FO - Part 2: Scheduled Releases with Approval

In Part 3 we add some nifty in line Powershell to pass the LCS File Asset Id between Stages in the Pipeline.