Monday 18 December 2023

Dynamics 365 Finance and Operations: Non-Azure AD external user sign-in Deprecation March 2024

This post has moved to my new website, if not redirected automaticaly please click here: https://anthonyblake.github.io/d365/finance/sysadmin/2023/12/18/d365-external-user-deprecation.html 

From March 2024, Microsoft will begin restricting access to users of Dynamics 365 Finance and Operations to only allow users which exist in the same Azure Active Directory tenant. This is billed as having an impact on 3rd party tenant accounts which are not b2b onboarded, however there is a potential integration impact which I will cover later.

This will affect any users from external tenants which are not also configured as guests in the host tenant for the D365 environment. These are the users where, for example, your tenant is contoso.com, but the F&O environment contains users which authenticate against my3rdpartytenant.com. These will be accounts which you see in your Users form with their own tenant suffixed on the provider. 

Microsoft have provided a link with clear instructions on how to implement guest accounts in Entra here:

https://learn.microsoft.com/en-us/entra/external-id/what-is-b2b

If an account is already guest on the F&O tenant, I don't believe any further action will be required in March 2024 when this is implemented.

Potential integration impact

If you have integrations which require access to D365 F&O, you are likely to be implementing authentication via Azure app registrations, which link to a user for Authorisation in the System administration->Setup->Azure Active Directory applications form. 


In integration design, it is likely that the user assigned to the AAD app is not intended to be used for D365 login, so it may have been created in the users form and not necessarily imported from AAD/Entra as real users are. There is the potential (not tried, so not confirmed) that the upcoming changes to authentication could disable the account linked to the app registration and therefore, integrations would stop working.

The solution would be simple, to setup the linked D365 user ID in the Azure AAD tenant. 

If this turns out to be an issue for integrations will depend on how the deprecation is implemented. For integrations, these users are not used to authenticate, only to authorise by linking AAD client Ids to security roles, so there could be no action to take. It is possible this impact may go under the radar, so its one to look out for in March 2024.

The announcement of the deprecation is here: 

Removed or deprecated platform features - Finance & Operations | Dynamics 365 | Microsoft Learn

Friday 1 December 2023

Azure Logic Apps (Consumption): Create an Asynchronous API for Long Running Operations

This post has moved to my new website, if not redirected automaticaly please click here: https://anthonyblake.github.io/azure/logicapps/2023/12/01/async-logic-app.html 


Get the code for this demo on GitHub, including 1-click Azure deployment and postman collection for testing:


Background

An HTTP triggered logic app is a great tool for creating an API which performs a set of actions when called. When those actions involve interacting with other applications and waiting for processes to complete, the can become long running. An example could be loading a batch of data to a Dynamics 365 Finance recurring integration, which involves uploading, queuing, and polling the application for a result.

When adding a specific response to a logic app, by default, the HTTP trigger will run synchronously, where the caller waits for the logic app to complete before receiving a response. In a long running process scenario, we can design the logic app to run using an asynchronous pattern.

This is great in 2 specific scenarios:

  • You want a return a response body from your Logic App to the API caller, without locking up a the callers session waiting for the long running App to complete.
  • For a consumption app, you have a workflow which runs for over the timeout limit of 2 minutes.

When running asynchronously, the Azure Logic App will send back an initial HTTP 202: Accepted response to the caller app, indicating that the request has been received and it is being processed. It also returns a URL in the Location header which can be used to poll the Logic App until completed. This will continue to return a 202 while the Logic App is running, when completed it will return the response defined in the workflow, usually a 200: OK, along with any body information from the call.

Create an Asynchronous Logic App 

In Azure portal (because the example is a Consumption Logic App), create a new Logic App.


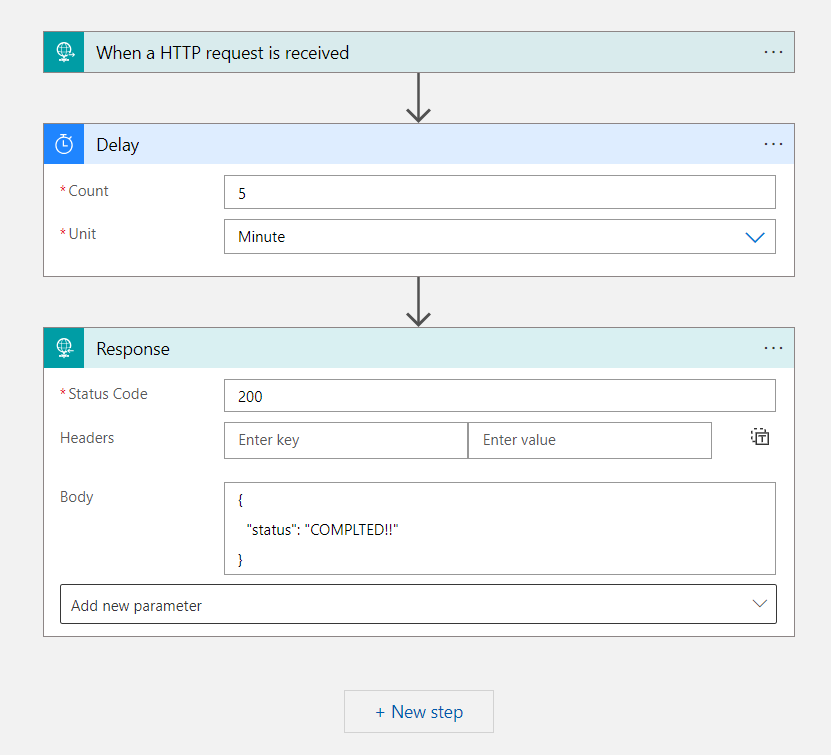
Add an HTTP request received trigger, on save the URL to trigger the logic app will be generated in the HTTP POST URL field.

Add a delay step to simulate the long running process. 


I went for a delay of 5 minutes, to prove that this Logic App remains responsive beyond the 2 minute consumption Logic App timeout, and to give me time to screenshot some responses.

Finally, add a response action. The status code I've chose for the example is 200 OK, and I've created a Json body containing a field called status, so we can see when the body is returned later.


The entire workflow should look like this.


At this point, running the workflow would return a timeout exception, because the response action would not be reached within the 2 minute timeout.

We need to modify the response to be Asynchronous. From the three dots menu on the Response step, click Settings.


The second option in Settings is Asynchronous Response. Toggle it to be ON.


Test the Workflow

The workflow is all set to return an Accepted response and be polled until complete. The best place to test it is in Postman.

In a new or existing collection, create a new HTTP post request using the URL generated when saving the HTTP request trigger in the Logic App earlier.

Hit the Send button. The response should be a 202 Accepted.


The location header in the 202 response contains the URL to poll for the status of the running logic app. If can be copied and pasted manually into a new GET request each time the logic app runs, or we can automate that using the Tests tab and an environment variable.

Create a new environment or modify an existing environment, and add the variable get_status_url;

To store the status URL from the location header, add the following code under the Tests tab of the initial request:

Copy and paste version:
pm.environment.set("get_status_uri"pm.response.headers.get("Location"));

Create a GET request, and for the URL use the environment variable get_status_url in double braces:


If the get request is called within the 5 minute delay, so while the Logic App is executing it's long running process, the response will continue to be a 202 Accepted, with a body containing the the status Running in the properties object.


Click send and poll the Logic App multiple times during the long running process. The response will remain a 202 Accepted until the Logic App completes, when a 200 OK will be returned, along with the body we defined in the Response step of the Logic App.


Done. An Asynchronous solution to allow Consumption Logic Apps to run for longer than 2 minutes, transferable to Standard Logic Apps to prevent caller threads being blocked, and potentially timed out, by long running processes.

Please leave a comment below if this has been useful - all feedback welcome.

Get the code for this demo on GitHub, including 1-click Azure deployment and postman collection for testing:


Sunday 3 November 2019

Azure DevOps for Dyn365FO Create Deployable Package - Include Source Controlled ISV Binaries

Background

This post will be a little different to my recent articles which have been in an step by step guide format. Instead, it's an addition to the guide for replacing your Create Deployable Package build step, which will allow you to include source controlled binaries in the Deplyable Package generated by Azure DevOps.


Prerequisites

If you are looking for a guide to implementing the Create Deployable Packages Azure DevOps Task by Microsoft, see my post here;

Azure DevOps Build & Release Pipeline for Dyn365FO - Create Deployable Package Task

For adding your ISV binaries to source control, so that your build box can include them as part of your single generated deployable package, see here;

Manage third-party models and runtime packages by using source control


Background


When I implemented the Create Deployable Package task in an implementation project recently, I noticed that the package size generated by the new Task, compare to the old Powershell Script, was significantly smaller. The new Zipped package was 25MB, when I was expecting it to be closer to the 135MB package generated previously.


Problem


On inspection, the problem was that the new package only contained binaries from any source code built by the agent during this run. So in this example, it contained our customer implementation model, but none of the ISVs which we also store in source control. 


Solution


On the build box, in the working folders for the build agent, the folder I setup in the build task parameters only contains the built binaries, and not the source controlled ISV binaries;

$(Agent.BuildDirectory)\Bin

 The folder which contains everything from source control is actually;

$(Agent.BuildDirectory)\s\Metadata

To include both folders, a change is needed to the Create Deployable Package task parameter for location of binaries.


Create Deployable Package - Old Parameters

In the Location of X++ binaries to package field, remove the \Bin folder;

$(Agent.BuildDirectory)

In the Search pattern for binaries to package field, replace the * with the following to include both folders;

Bin/*
s/Metadata/*


Create Deployable Package - Updated Parameters


It is important to note here, that the Search pattern for binaries to package uses Azure DevOps file matching patterns, which use the forward slash to denote directories, even when your build server is running on Windows. Read more about them here;

File matching patterns reference

Save and queue the pipeline, and on the next run your binary ISVs will be back.


Thursday 3 October 2019

Azure DevOps Build & Release Pipeline for Dyn365FO - Add Licenses to Deployable Package Task

Add Licenses During the Build Pipeline or Release Process

Background

In this post, I will be focusing on the Add Licenses to Deployable Package Task, which is the second of the new tasks I have had the opportunity to try out. To read about the Create Deployable Package Task, take a look at my previous post;
Microsoft have released 3 new Azure DevOps tasks to support the upcoming preview of Azure DevOps hosted builds, which will enable building without a dedicated server hosting the build agent.
The tasks are;
  • Create Deployable Package 
  • Add Licenses to Deployable Package
  • Update Model Version
Add tasks from Dynamics 365 Finance and Operations Tools

Information about all 3 new tasks has been posted on release by Microsoft's Joris de Gruyter here;

Add Licenses to Deployable Package Task

As with the new Create Deployable Packages Task, the Add Licenses to Deployable Package Task brings immediate benefits. Rather than install our ISV Licenses in a seperate deployable package to the application, we can add them to the application deployable package as part of the Build or Release Pipeline.
For this example we will modify an existing build definition.
If you have already setup a release pipeline from any of my previous posts, the latest Tasks will already be installed on your Azure DevOps instance as part of Dynamics 365 Finance and Operations Tools, so I won't cover installing them, and assume they are already there.
If you are looking for how to install Dynamics 365 Finance and Operations Tools on your Azure DevOps instance, or how to set up an Azure DevOps Release Pipeline, then start here;
Azure DevOps Release Pipeline for Dyn365FO - Part 2: Scheduled Releases with Approvals

Browse to Pipelines then Builds in Azure DevOps.
Azure DevOps Pipelines

At this stage I almost always click on the 3 dots in the top right and Clone the build definition before going any further.
Clone a build definition

Click on Edit on your original or cloned build definition.
With the build pipeline open for editing, browse the task Publish Artifact: Packages. 
Publish Artifact: Packages

Click the + at the top of the build phase to add a new task;
Add task to Build Phase
Search for Add Licenses to Deployable package, and add the task below.
Add Licenses to Deployable Package Task

We need to place the task to include the licenses just before publish. Drag the task to position it directly before Publish Artifact: Packages. In the example build definition I am modifying here, the task before is Copy Files to: Staging Directory. 
Position the Add Licenses Task

There are 3 properties to set. Name can be anything.
Search pattern for license file to add to package is where we specify were to pick up the license text files.
I created a folder on the Service Drive of the Build box (likely to be K:) called licenses. In there I dropped 2 license files.
Licenses as Text Files in Windows Explorer

Then set the search pattern to look in that location for any files, using *.
Add Licenses to Deployable Package - Parameters
The filename and path of the deployable package should be set to one of the following examples. If your pipeline uses the old poweshell task for creating your deployable package;
$(Build.ArtifactStagingDirectory)\Packages\AXDeployableRuntime_7.0.5286.35426_$(Build.BuildNumber).zip
The filename in this case still needs to have the platform build number.
If you have moved to using the new Create Deployable Package Task, you can use the following;
$(Build.ArtifactStagingDirectory)\Packages\AXDeployableRuntime_$(Build.BuildNumber).zip
Using this method, the platform build number is no longer part of the package name.
Add Licenses to Deployable Package - Parameters
...that's the new Task setup complete. Run the build pipeline and get an output from the Add Licenses to Deployable Package task.

Add License to Deployable Package Output

To give feedback or ask questions please leave a comment here, or tweet me @AnthonyBlakeDev 


Sunday 8 September 2019

Azure DevOps Build & Release Pipeline for Dyn365FO - Create Deployable Package Task

Background


Microsoft have released 3 new Azure DevOps tasks to support the upcoming preview of Azure DevOps hosted builds, which will enable building without a dedicated server hosting the build agent.

The tasks are;

  • Create Deployable Package
  • Add Licenses to Deployable Package
  • Update Model Version

Add tasks from Dynamics 365 Finance and Operations Tools


Information about all 3 new tasks has been posted on release by Microsoft's Joris de Gruyter here;

https://community.dynamics.com/365/financeandoperations/b/newdynamicsax/posts/azure-devops-tasks-for-packaging-and-model-versioning


Create Deployable Package Task


Initially I have been trying out the Create Deployable Package task, and this article will demonstrate how to implement it to replace the Generate Packages powershell build task, which currently Packages our built binaries for release. This example only produces a package of binaries, and not a package for the model (source code).

I've chosen to try out this task first as it brings immediate benefits for all my existing release pipelines. It allows us to specify the name of the package we create and upload to Azure DevOps Build Artifacts, which is important later in the Release Pipeline.

The existing Powershell task, which uses GeneratePackage.ps1 from the DynamicsSDK folder, generates a package filename which contains the build of D365FO from the build box which is hosting the agent.


Powershell generated package name

When we later pick this filename up as a source artifact in the release pipeline, we don't have a Pipeline Variable for the D365FO version like we do for the build number. This means that every time a one version update is applied to the build box, that filename will change, and all our release pipeline definitions will need to be updated. The Create Deployable Package task allows us to set the filename for the Azure DevOps build artifact.

For this example you will need an existing build definition, and an existing release pipeline which uses the generated package.

If you are looking for how to set up an Azure DevOps Release Pipeline, start here;

Azure DevOps Release Pipeline for Dyn365FO - Part 1: Automated Package Upload & Deploy via LCS API
Azure DevOps Release Pipeline for Dyn365FO - Part 2: Scheduled Releases with Approvals

If you have already setup a release pipeline using the task to upload an Asset to LCS and deploy it to an environment, the latest Tasks will already be installed on your Azure DevOps instance as part of Dynamics 365 Finance and Operations Tools, so I won't cover installing them, and assume they are already there.


Step 1 - Modify the Build Pipeline


Browse to Pipelines then Builds in Azure DevOps.


Azure DevOps Pipelines

At this stage I almost always click on the 3 dots in the top right and Clone the build definition before going any further.
Clone a build definition

Click on Edit on your original or cloned build definition.

With the build pipeline open for editing, browse to the generate packages Powershell task.
Generate Packages Powershell Task

In case you have it named differently, it is the Poweshell task which runs GeneratePackages.ps1 from the DynamicsSDK folder on the Build VM
Generate Packages Task Properties

Right click this step, and chose Disable selected task(s). It can be deleted later, but we can keep it here in a disabled state for reference for now.


Disable selected task

In this example there is a single task which drops the package straight into the staging directory for upload. 

Click the + at the top of the build phase to add a new task;


Add task to Build Phase


Search for Create Deployable Package, and add the task below.
Add Create Deployable Package Task

Drag the new task to be in the same position as the disabled Powershell task. It should be after Build, Synchronise, Deploy Reports, and be before Publish Build Artifacts.
Position of new task in build phase

Set the field X++ tools path to AOSService\PackagesLocalDirectory\Bin wherever that is located on your build VM. 

If the build agent is on a cloud hosted VM, it is likely to be K:\AOSService\PackagesLocalDirectory\Bin. 
If the build agent is on a Local VM, is will be C:\AOSService\PackagesLocalDirectory\Bin.

Set the Location of X++ binaries to package to the output folder from the MSBuild task.
MSBuild OutputPath Parameter

It's likely to be $(Agent.BuildDirectory)\Bin as per the above screenshot.

Leave the Search pattern for binaries to package as *. This field can be used to exclude files and folders from the final package. 

Set the field Filename and path for the deployable package to the publish artifact staging directory from the Path to publish field, plus a filename. In this example it is $(Build.ArtifactStagingDirectory)\Packages\AXDeployableRuntime_$(Build.BuildNumber).zip.
Create Deployable Package Properties

Note that we have set the filename to AXDeployableRuntime_$(Build.BuildNumber).zip.

Build.BuildNumber is a pipeline variable we have access to when setting up the release pipeline, so the filename is unique but not dependant on the D365FO version as it was previously.

Save & queue a build.

When the build completes, the Package is published to Artifacts with the new filename.


Build Artifact Name


Step 2 - Modify the Release Pipeline


Now that the published build artifact is renamed, any release pipelines referencing the package need to be updated.

Browse to Pipelines and Releases, and click edit on the Pipeline you need to change. As with the build, I would work on a copy of the pipeline by firstly clicking on the 3 dots in the top right and selecting Clone.

If you cloned the build definition in Step 1, you will first need to add a new artifact. Select the existing artifact and click delete in the top right of the properties dialog.


Delete Artifact

Add a replacement Artifact. Select the source as your new build pipeline.
Add Artifact Dialog

Now find the stage which contains your LCS Asset Upload task and select if for editing.
File to Upload

In the File to upload field, browse to the new package file. Replace the build number with the pipeline variable $(Build.BuildNumber).

Either create a release now or wait for the next schedule to test.

Done. The next time a one version update is applied to the server hosting the build agent for this pipeline, no action will be needed to update the File to upload field with the new version number.


Edit: Since writing I have followed this up with an article on how to include your source controlled ISV binaries in the deployable package generated by this Azure DevOps build task. You can read it here;

Azure DevOps for Dyn365FO Create Deployable Package - Include Source Controlled ISV Binaries